How to Import & Use Adjustment Presets - Luxe LUTs
FollowLUTs are a powerful, flexible color-grading option for editing video and photos! These unique tools are one of our most versatile offerings with a variety of file types available depending on your unique editing needs and owned software! If you only need these for one thing or only plan on using them in one specific software, you’ll only need to select and download the files in one format.
This guide focused on installing & using your new Luxe LUTs as Adjustment Presets for Photoshop! This is a quick process, but broken down into bite-sized steps!
Learn more about Adjustment presets on the Luxe Blog!
This format allows you to import LUTs as hover-to-preview, click-to-apply Adjustment Presets in subscription versions of Photoshop to edit images directly from the Photoshop workspace.
Before you download your new Luxe LUTs (in Adjustment Presets in PSAP format) for Photoshop, make sure that you are using a fully up-to-date subscription version of Photoshop. You can check for updates under Help > Updates.. in Photoshop or via the Adobe Creative Cloud application!
➤Download Your Files
Select the PSAP FILES option from your download link under “Additional Software Options for Photo Editing”:

And click to download the available file(s):
If you purchased a single collection of LUTs you'll only see one file for each format. If you purchased the LUTs bundle, you'll see a download for each included collection.
➤ Option 1 - Double-Click to Import
Once downloaded, locate the PSAP file in your "Downloads" folder and simply double-click that PSAP file to quickly launch Photoshop and import the files all-at-once!:
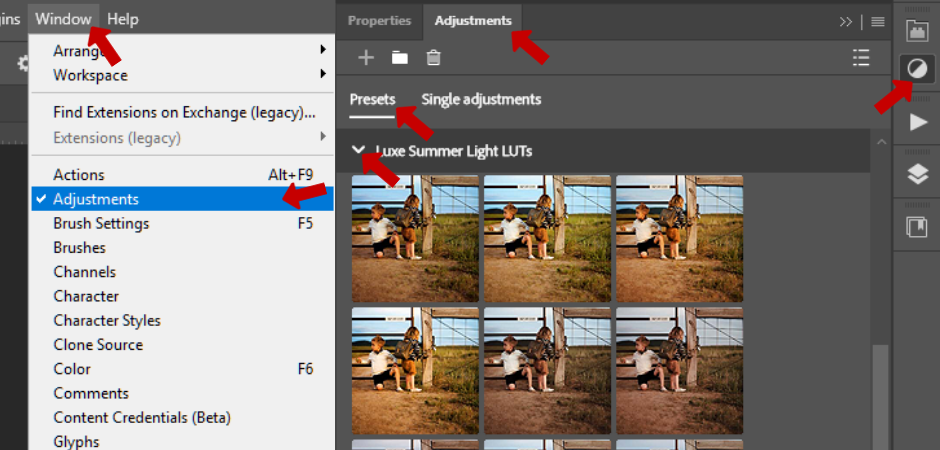
Locate your newly installed Adjustment Presets under “Window” > “Adjustments” > “Presets” - Expand the group with the little arrow. Hover to preview, click to apply! These apply as layers:
➤ Option 2 - Import Presets
Select the little ☰ Icon on the top right of the Adjustments window to open the Adjustments Menu. Select “Import Presets” from the bottom of that menu.
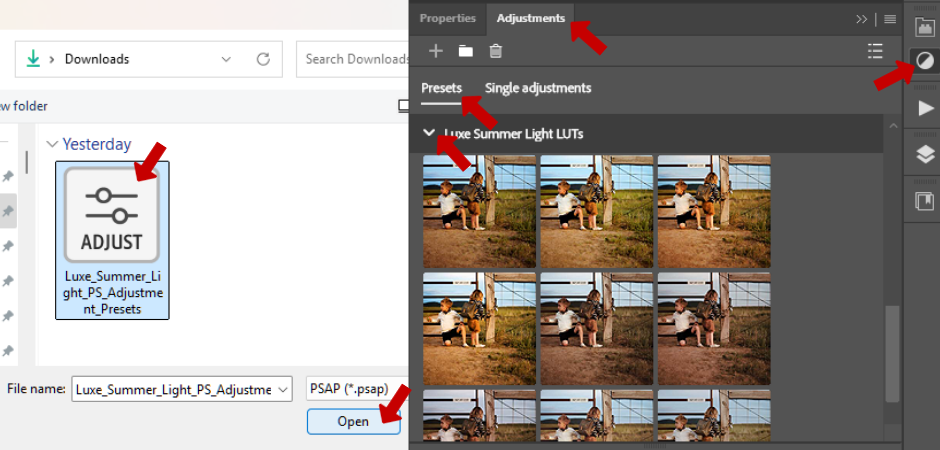
Select the PSAP file(s) you downloaded and click “Open” to import. If you see the group title, but not the options under “Presets” in your Adjustments Window, simply click the little > to expand the group and see the preset options as thumbnails:
➤ Use your Adjustment Presets!
Hover to preview edits, click to apply!
Once applied, it will show up in your Layers panel as an expanded layer group featuring the applied LUT:
You can adjust opacity to adjust the strength of the applied edit:
You can click on and use the white layer mask on the Color Lookup layer or on the layer group to mask the LUT look to a specific part of your image.
How to remove the edit from parts of your image
On “Layer 1" or your “Background” layer use the Object Select tool to easily define what you’d like to exclude from the edit:
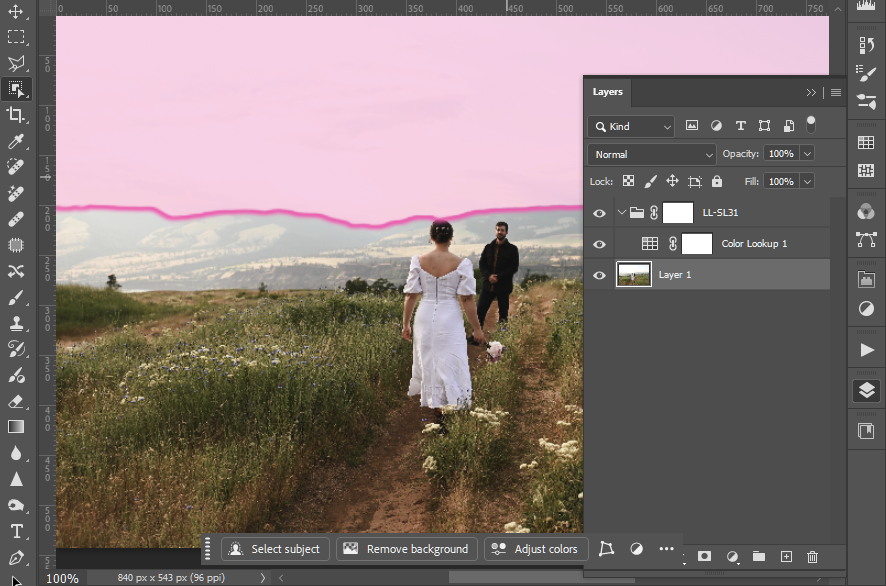
Click what you'd like to exclude to make the selection, or use "Select" People from the top toolbar, and select a specific subject and subject attribute and click "apply" to make a selection:
With a selection made, click back over to the white layer mask for your applied LUT edit, and brush over or use the contextual toolbar to fill the selection with black:
How to apply the edit to a specific part of your image
On “Layer 1" or your “Background” layer use the Object Select tool to easily define where you want your edit. Here I used Select People to select subject skin:
Then click the "Invert Selection" option from the contextual toolbar to invert the selection:
With the inverted selection made, click back over to the white layer mask for your applied LUT edit, and brush over or use the contextual toolbar to fill the selection with black:
From here you can adjust opacity to taste:
If you immediately apply a different LUT with that selection still made, it will auto-mask out what you've already edited in the last step:
Hover to preview localized edits
If you want to see what specific LUTs would look like on specific parts of your edit, you can make a selection and hover-to-preview for that selection! Here I selected the sky, and then hovered over one of our LUTs to preview what the color grading would look like only in this zone:
Applying LUTs as Adjustment Presets allows for an easy, super-versatile, dynamic, and fun way to edit your images in just-a-click directly from the Photoshop workspace! Love an edit an want to share it with us? Learn how you can share HERE!
Run into trouble? Reach out to our team at support@theluxelens.com for 1:1 download, installation, and use support and custom workflow recommendations!